Training on a variety of technology-related topics is available to the campus community. Sessions are announced through campus email.
Technology Training Room
In person training, meetings and open office hours are held in the Technology training room, located in Conlon Hall room 230.
The University's Technology Trainer, Allison Bunnell, can support you during open office hours:
- Mondays: 10 a.m. - 12 p.m.
- Thursdays: 1 p.m. - 3 p.m.
No appointment necessary!
Google Workspace Resources
In addition to the trainings listed below, you'll find additional information on using Google Workspace applications on these pages:
Virtual Trainings
Below are previously recorded virtual training sessions on a variety of technology topics. Virtual training videos are also available on our Technology Training YouTube channel.
Faculty teaching hybrid classes now have the ability to use the classroom document camera to share what is being demonstrated simultaneously with in-person students and the Google Meet participants.
- Document camera tutorial (video)
- Using a document camera with Google Meet (Google Doc)
- Using the Podium Camera and Microphone (video)
Learn how to record video, and embedded captions in Google Meet. Also, find out how to obtain a Google Doc transcript and tips along the way:
ScreenPal trainings are available on the ScreenPal page.
-
What's new in Windows 11? (video)
-
Windows 11 Slides Presentation (Google Slides)
-
Windows 11: Quick Reference Guide (Google Doc)
Tech Tips and Google Good Ideas
You can find all the Tips and Good Ideas in our shared Google Folder.
Too many emails? Gmail has FILTERS!
With Gmail features, your workflow has improved but you’re still finding that the number of emails coming in is a bit overwhelming. You want to ensure that you don’t miss an incoming email from a specific colleague.
As we navigate the digital landscape, efficient email management becomes increasingly crucial. Gmail filters offer a powerful solution to streamline your inbox and enhance productivity.
Let’s explore how you can leverage these automation rules effectively:
- Organize Emails: Redirect emails: Automatically route specific emails to a named label, or archive them - keeping your inbox clutter-free.
- Identify Spam: Filters can swiftly identify spam and move it out of your inbox, ensuring that important messages receive your attention.
- Manage Notifications: Bypass unimportant app notifications: Set up filters to prevent notifications from flooding your inbox.
- Automate Tasks: Delegate tasks effortlessly: Label emails related to specific projects or contacts automatically using filters
Create a filter
Using the Gmail Search bar, create a filter for incoming messages from a specific person so that their messages are always starred. You can also create a label for these emails. OR if you want to filter messages to skip your inbox, you can do that too!
You can manage your incoming mail using Gmail’s filters to send email to a label, or archive, delete, star, or automatically forward your mail.
- Open Gmail.
- In the search box at the top, click the Down arrow .
- Enter your search criteria. If you want to check that your search worked correctly, see what emails show up by clicking Search.
- At the bottom of the search window, click Create filter.
- Choose what you’d like the filter to do.
- Click Create filter
Use a particular message to create a filter
- Open Gmail
- Check the check box next to the email you want
- Click More
- Click Filter messages like these
- Enter your filter criteria
- Click Create filter
Remember that when creating a filter to forward messages, only new messages will be affected. Additionally, if someone replies to a filtered message, their reply will be filtered if it meets the same search criteria.
Lastly, consider filtering by topic or from specific email addresses. Be careful you aren't selecting to filter an entire
distribution group such as "staff" by mistake.
Feel free to explore Gmail’s filter options and tailor them to your preferences. Efficient email management awaits!
Google Meet has live captioning available to each participant in the Meet. Consider reminding students and participants that they can personally turn live captions on and off throughout the Google Meet!
Benefits to participants using live captions during a Google Meet
- Live captions can assist hard of hearing and deaf participants;
- Participants whose second language is English, can use live captions to follow along;
- Captions offer guidance with comprehension of dialogue that is spoken very quickly, with accents, mumbling, or background noise.
- Live captions can provide clarity to full names, brand names, or technical terminology for the viewer.
Live captions can offer concentration, which can provide a better experience for viewers with learning disabilities, attention deficits, or autism.
- Reference: https://www.3playmedia.com/blog/who-uses-closed-captions-not-just-the-deaf-or-hard-of-hearing/
When using captions in Google Meet, you now have the option to include those captions in a meeting recording!
Including captions in your meeting recordings offers accessibility to your audience along with helping them understand the content, and staying engaged.

To get started at the bottom right, click Activities and then Recording.
Please note, the transcription translation is done by a computer and won't be 100% accurate all the time.
Therefore, if you couple this with the transcription feature, you can obtain a transcription of the Meet in Google Docs - which is editable. In turn, for the most accurate and accessible captions, you can edit the transcription and from there, you can copy and paste the captions into YouTube editor or wherever you are hosting your video.
Note that to record a meeting, you have to be:
- The meeting host.
- Part of the host’s organization.
- Promoted to a co-host if you are outside the meeting hosts organization.
- A teacher or co-teacher for meetings created through Google Classroom.
For more information, see:
The appointment scheduling tool in Google Calendar is a feature that allows you to share your availability via a booking page that can be used by colleagues, external contacts and students to schedule a meeting with you.
Google has also introduced the ability to check and see a visual preview of multiple calendars when setting up your appointment schedules. Your booking page will show you as unavailable when you're busy based on the calendars you choose. (By default, your primary calendar is always selected.)
Learn about appointment schedules on Google Calendar and how to turn on the new Appointment Scheduler if you choose.

New appointment schedules offer the following improvements:
Use your own professional booking page
- You get a professional booking page for the different types of appointments you offer.
- Anyone with an email address can book an appointment.
- Your booking page automatically updates to avoid conflicts with other events on your calendar.
Get appointment email notifications
- You get booking confirmation and update emails.
- People who book an appointment with you can also receive an automatic reminder email before the appointment.
You can customize how you meet
- In person
- On the phone
- Over Google Meet video conference
If you choose to meet over video conference, a Google Meet link is automatically added to your appointments.
Customize your appointment availability
- You can limit how people who book early or last-minute can book an appointment with you.
- You can limit the max number of appointments per day.
- You can customize the window for appointments.
- You can automatically add custom buffer time in between appointments.
- You can collect extra information from people who book appointments through the appointment booking form.
Fitchburg State's Google Meet tool has the ability to host individual video conferencing sessions that include up to 250 participants and Live Stream events for up to 100,000 people.
When hosting a large Google Meet or Live Streaming an event with our Fitchburg State University accounts, please keep in mind the following:
Inviting Non-Fitchburg State Participants to a Google Meet
If you have included external (non-FSU email) participants in your Google Meet, you will need to accept them into the meeting when prompted.

You can either send the invitation through your Google Calendar or separately. If you send them an invitation through your Google Calendar, you will be prompted to allow the invite to go out to an external participant email address.

Google Meet Live Streaming
By default, only guests within Fitchburg State can view the live stream. In order to share the live stream with non-Fitchburg State participants, create a view-only event. The event is added to your Calendar and includes the link for view-only guests.
(Also, remember those live streaming will only view the real-time event and not have access to speak or the chat function.)
Click the Add live stream link:

Create a view-only event:

As you begin planning a large Google Meet or Live Streaming events, please feel free to contact the Technology Department to assist.
Have too many tabs open at one time?
You can save tabs into groups and then open tab groups across desktop devices when you need them. This makes it easier to clean up your tab strip and keep you less distracted from all the rest.
Organize your Tabs with Tab GROUPS
- On your computer, open Chrome.
- Click New tab + .
- Right-click a tab and then select Add to new group.
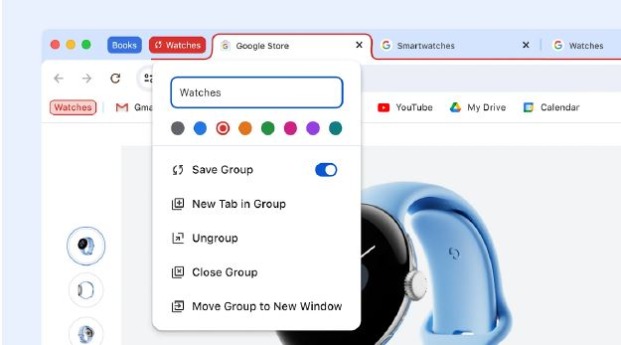
Save your tab groups for later
- Right-click a Tab and select Add tab to group.
- Turn on Save group and your group will appear in the bookmarks bar.
- To remove the group from your tab strip but keep it for later, right-click the group header and select Hide.
- On a different desktop device, sign-in and see your groups in the bookmark bar.
Easily Share Google Drive Files to Google Calendar Meeting Attendees
While in the sharing dialog box of any Google file, users can now see an option to share with those in upcoming Google Calendar invites.
This allows users to easily share files with all meeting attendees in one step, ensuring everyone is prepared and able to collaborate on the same file in advance of the meeting.
How to:
As a file owner or editor, go to the Share button in a file > type in the title of a calendar event > select the event
> confirm the correct list of meeting attendees are added > select the users’ access level > click Send.
- If you’d like to link the file to the calendar invite, you can select “Attach to calendar event” before clicking Send.
- If you attach a file directly to a Calendar invite, you will see a pop-up asking if you'd like to share the file with the meeting attendees.
- To share a file to a calendar event, you must be the file owner or editor and be a participant on the meeting that you’re sharing to on your calendar.
Create fully customized emails using enhanced Gmail layout editor tool
In the layout editor, you can create a new email layout from scratch or select from a predefined set of email templates, which include images, text elements and buttons.

You can then fully customize these templates by placing elements such as color schemes, logos, images,
footer text and links wherever you’d like. You can also share a layout file directly from the email layout editor using the 'Share' button. Once another user has edit access, they can open the same layout in their Gmail or from Drive and you can collaborate with them in real time.
Look here for more on using customization.
[Please note, this feature is a part of the Workplace for Education Plus license. If you do not have this feature and would like it, please contact the IT Help Desk.]
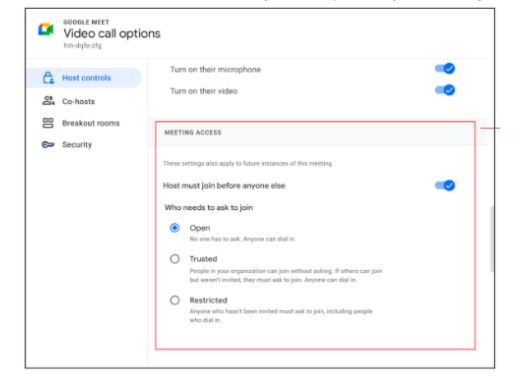
Google Meet Access Controls
To help ensure your meetings run as smoothly as possible, Google replaced the "Quick Access"
settings with a more intuitive and simplified set of controls for meeting organizers and hosts in
Google Meet.
From a Google Calendar invite or Google Meet itself, meeting organizers will now be able
to pick from the following three levels of access:
Open:
- Anyone with a meeting link will be able to join your meetings.
- No one will have to ask to join.
- Anyone can dial in.
Trusted:
- Anyone within the meeting hosts’ organization will be able to join
- without having to ask to join (AKA knocking).
- Anyone outside the organization but invited via a Google Calendar
- event, or anyone invited from within the meeting, will also be able to
- join without having to ask to join.
- Anyone can dial in.
- Everybody else will have to ask to join.
Restricted:
- Only someone who is invited via a Google Calendar event or someone
- invited from within the meeting by a host will be able to join.
- Everyone else will have to ask to join, including participants inside a
- host’s organization who aren’t included on the invite, and those dialing
- in.
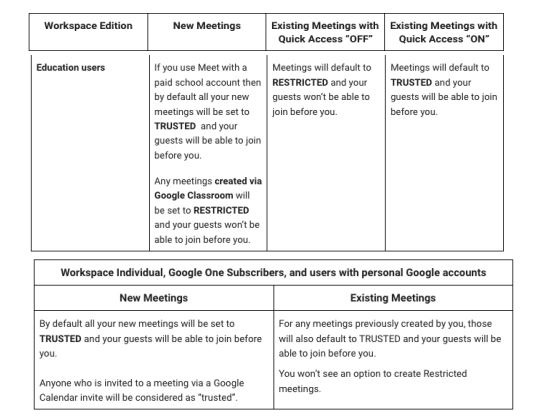
Additionally, meeting hosts can configure whether guests can join the meeting before hosts.
See below for more information regarding how the new behavior will be applied to new and
existing meetings:
[Please note, these features are a part of the Workplace for Education Plus license. If you do not have these
features, and would like them, please contact the IT Help Desk.]
We know that using the Fitchburg State University Single Sign On Login Portal is a breeze especially because you log in securely and your applications are there! BUT what about the websites that you use often for a specific project or for reference. The ones you go to a separate website browser to view?!
Good news...you can add those links to YOUR login portal!
We're excited to share simple instructions on how to add additional website links/apps and create collections in your "My Apps" page within your Fitchburg State University Login Portal.
I use Trello for project management. Let's add this website to my login portal!
Adding Apps/Websites:
- Sign in to Fitchburg State Login Portal with your Fitchburg State University credentials.
- Once logged in, click on the "My Apps" tab located on the left-hand sidebar. This will take you to your personalized apps dashboard.
- Click on the "Add Apps" button, located at the top right corner of the page.
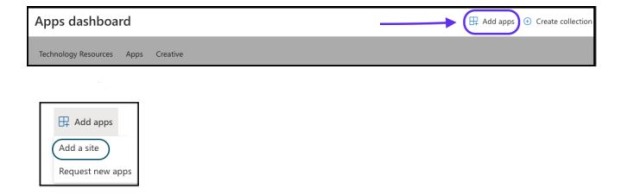
- Select "Add Site"
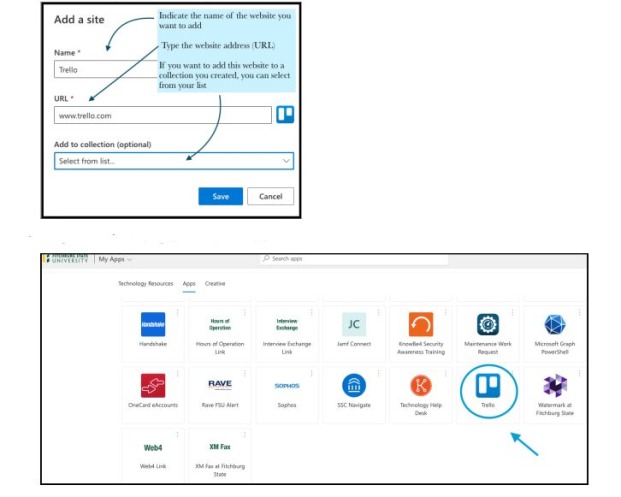
- Complete the information about the site you want to add, select "Save"
- The app will now be added to your "My Apps" dashboard for easy access.
Creating Collections:
- Navigate to the "My Apps" tab from the left-hand sidebar after signing into the Fitchburg State Login Portal.
- Click on "Create Collection" located at the top of the page. Click on it to start creating a new collection.
- A pop-up window will appear prompting you to give your collection a name. Enter a descriptive name for your collection (e.g., "Productivity Tools", "Design Apps", etc.).
- After naming your collection, you can start adding websites/apps to it. Simply drag and drop the desired websites/apps from your "My Apps" dashboard into the collection.
Organize Your Collection: Arrange the websites/apps within your collection in the order you prefer by dragging them into place.
Save Your Collection: Once you're satisfied with your collection, click on the "Save" button to save your changes.
That's it! You are now on your way to forming an organized "one stop shop" by adding websites/apps and
creating collections in your Fitchburg State University Login Portal - "My Apps" page.
If you have any questions or need further assistance, feel free to reach out to Technology Trainer, Allison Bunnell or our Help Desk. We're here to help!
This feature offers instructors a centralized snapshot of how each student in their class is progressing. Instructors are provided direct visibility into student performance and engagement in the classroom, including if assignments are being completed, how grades are trending, and how Classroom features are being adopted.
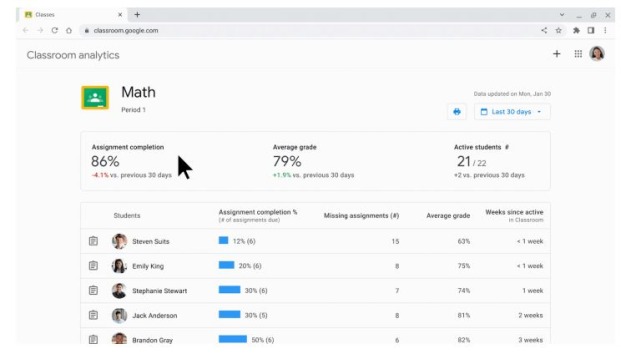
Find the analytics page for your class:
(To view the analytics class page as a teacher, you must first have a Google Workspace for Education Plus license assigned to you.)
- On your computer, go to classroom.google.com.
- To view analytics for your class, on a class card in the homepage or in the header bar in a class, click Analytics.
More information about Google Classroom analytics
[Please note, this feature is a part of the Workplace for Education Plus license. If you do not have this feature and would like it, please contact the IT Help Desk.]
Google has incorporated two exciting features guaranteed
to enhance your Google Slides experience!
ANNOTATIONS IN GOOGLE SLIDES
Lets you highlight or emphasize key content while you present in Google Slides. With the new pen tool, you can circle, underline, draw connections or make quick notes directly on your presentation.
How to... highlight and annotate as you present
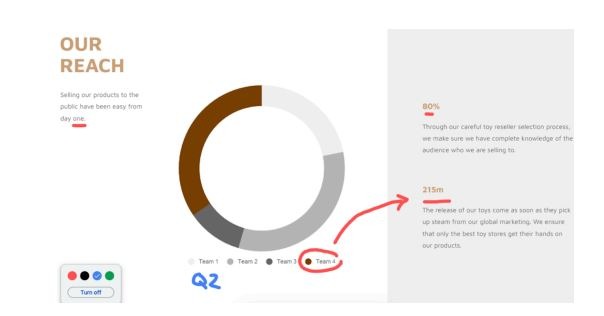
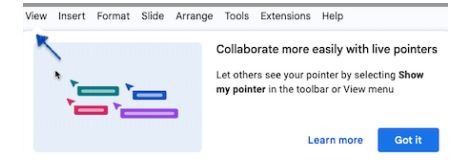
LIVE POINTERS IN GOOGLE SLIDES
Allows you and your colleagues to see each other’s mouse pointers in real-time. Co- creators can easily point out specific text or visual elements within a Slide in order to highlight important information and content.
Please note, these features are a part of the Workplace for Education Plus license. If you do not have these features, and would like them, please contact the IT Help Desk.
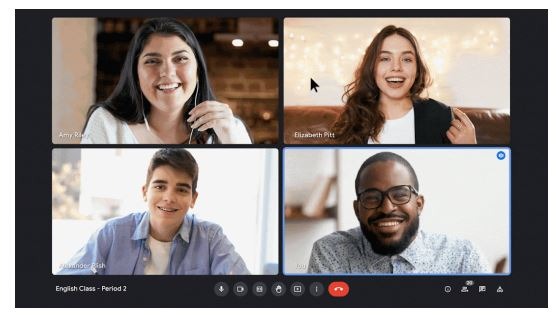
Pair Your Video Tile in Google Meet to Improve Accessibility
Google has introduced tile pairing for Google Meet, which will allow you to pair your video tile with
another meeting participant's tile. Once you pair your tile, other meeting participants will see both tiles shown next to each other. Both pairing partners will have their borders outlined in blue when speaking. Tile pairing will be indicated in the meeting captions as well.
GOOD IDEA
Tile pairing can help make meetings more accessible, specifically in situations where you want to ensure a sign-language or other language interpreter is visible during the meeting. You can also use this feature to pair speaker duos or presenters with co-presenters for a more dynamic presenting experience.
Note - At this time, tile pairings will not be captured in meeting recordings. Also, tile pairing is not available in break out rooms at this time.
More information on Pairing Tiles in Google Meet.
[Please note, these features are a part of the Workplace for Education Plus license. If you do not have these features, and would like them, please contact the IT Help Desk.]
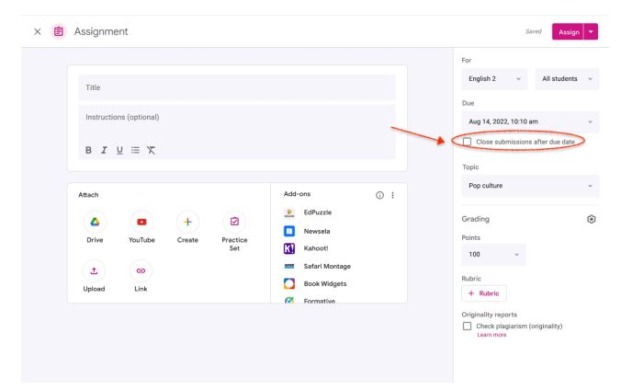
When creating a new assignment in Google Classroom, an instructor can now decide whether or not to require a strict due date. (By default, the assignments tool will still allow submissions after the due date unless marked otherwise.)
This feature also allows instructors to choose to stop submissions for an assignment at any point,
regardless of the strictness or presence of a due date. For example, an instructor could allow
submissions for any assignment during the semester or year, but turn off submissions once the
period is completed.
More information to create an assignment.
[Please note, this feature is a part of the Workplace for Education Plus license. If you do not have this features, and would like
it, please contact the IT Help Desk.]
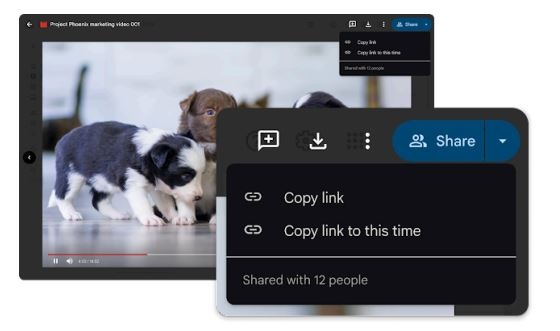
Copy a specific time in a Google Meet video
Google added new functionality to the Drive sharing button that allows you to share timestamped links to specific parts of a video.
- On your computer, go to drive.google.com.
- Open a video.
- Go to a specific time in the video that you want to share.
- At the upper right, click the drop down beside "Share."
- Click "Copy link to this time" .The video is copied to your clipboard.
Tip: To play videos in Drive, you need to turn on third-party cookies.
More information to store and play video in Google Drive.
[Please note, this feature is a part of the Workplace for Education Plus license. If you do not have this feature, and would like it, please contact the IT Help Desk.]
When you "make a copy" of a Google Doc, it should be private to you. However, if the document you are copying is saved within a folder shared among many people - by default, the document will automatically save back into that folder. In turn - all the same people that the folder is shared with will also have access to your copy!
Solution = SLOW down and select "My Drive" when you are copying documents from shared folders to avoid this issue!
Watch this YouTube video for more information.
Look no further if you want to better connect with your audience while using video during presentations!
Users can insert a variety of speaker spotlight shapes directly into their slides and format them in a variety of ways.
Once in slideshow mode, your camera feed will appear in the shape you select so you can deliver a fascinating presentation. Speaker spotlight also integrates seamlessly with Meet and Slides Recordings for more engaging virtual or recorded presentations.
Imagine...You are leaving a meeting in a building across campus, but during your walk back to your office you quickly join a Google Meet on your mobile device, and without missing any key moments you continue meeting by seamlessly transferring to your computer to continue the conversation without the need to hang up or rejoin!
A new feature in Google Meet makes this possible! You'll now see a new “Switch here” option when joining a meeting on your laptop, which will switch the call from your mobile devices while maintaining an ongoing conversation and without worrying about missing important information.
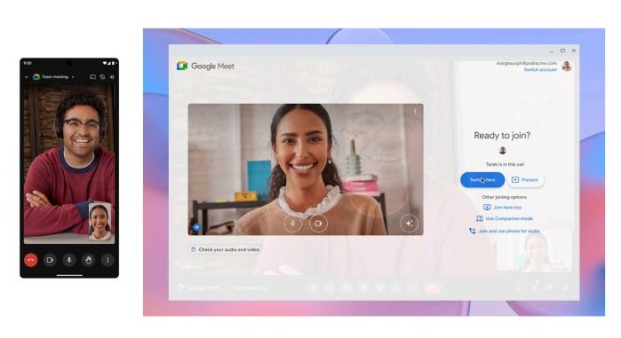
More information on how to transfer a meeting between devices.
[Please note, this feature is a part of the Workplace for Education Plus license. If you do not have this feature, and would like
it, please contact the IT Help Desk.]
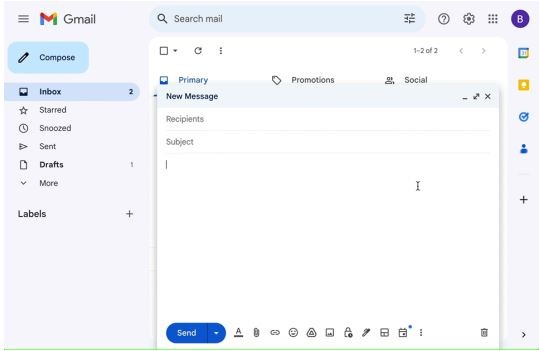
Google introduced an easier way to schedule meetings WITHIN Gmail
This feature makes scheduling much easier by reducing the back-and-forth in lengthy email threads when scheduling meeting times.
While composing an email, you will see a new Calendar icon with all Calendar-related actions consolidated and easily discoverable.
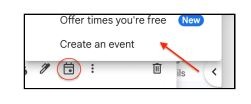
- Offer times you’re free: This option opens up your calendar on the right. You can select and insert proposed meeting times directly from your calendar into the email without leaving Gmail. The recipient of the email can then review the proposed times and select one directly from the email to automatically get an email with a calendar invite.
- Create an event: This is a quick way to schedule a meeting and share the event information back in the email. Starting the flow opens up a calendar event creation on the right with the recipients and title pre-filled from the email. An event summary will automatically be inserted into the email body for easy sharing.
More information on how to schedule events in Gmail.
Note:
Offer times you’re free: Time suggestions can only be made for your primary calendar at this time and only work for 1:1 meetings. If multiple people are included in the
recipient list, only the first person to book an appointment will be added to the event automatically.
Create an event: If you are creating events from Gmail, you can create them on any of the primary or secondary calendars you have manage access to.
[Please note, these features are a part of the Workplace for Education Plus license. If you do not have these features, and would like them, please contact the IT Help Desk.]
Easily customize a Fitchburg State University Google Form using the Template Gallery and customize a Blank Form with the Customize Theme tool. Watch this YouTube video to learn how to customize Google Forms.
Google Forms allows you to easily customize the appearance of your forms to match your branding or personal style. With just a few clicks, you can change the color scheme, add images or logos, and even customize the font.
To get started, simply open your Google Form and click on the "Customize Theme" option in the top right corner. From there, you can choose from a variety of pre-set color themes or create your own custom color palette. You can also upload your own image or logo to include at the top of the form.
Additionally, you can change the font style and size for the form title, descriptions, and questions to ensure a consistent look and feel.
Give it a try and make your next Google Form stand out!
The Google browser recently celebrated 15 years. Learn more about the newest features it can offer here.
Here are just a couple...
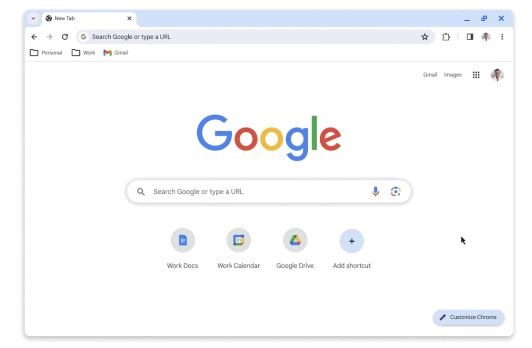
- Personalize Your Browser: Chrome’s icons have been refreshed with a focus on legibility and new color palettes that better complement tabs and toolbars. These can help you distinguish between different Chrome profiles.
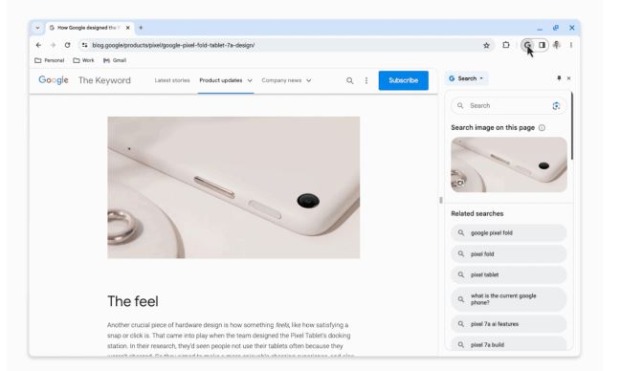
- Easy Browsing with Search Features: Search this page with Google'' option from the three-dot menu will open the Google Search side panel, where you can find related searches, learn more about a page’s source or start another search altogether. You can even pin the Google Search side panel to your toolbar.
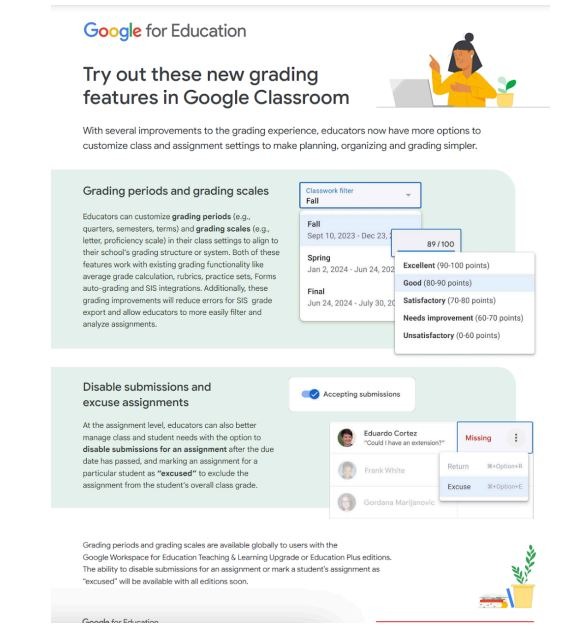
Grading is getting better in Google Classroom
With several improvements to the grading experience, more options are available to customize class and assignment settings. All designed to make planning, organizing and grading simpler for YOU, the instructor.
"Grading periods (e.g., quarters, semesters, terms) and grading scales (e.g., letter, proficiency scale) can now be set-up and customized in class settings, and at the assignment level. Additionally, educators can better manage class and student needs with the option to disable submissions for an assignment after the due date has passed, and mark an assignment for a particular student as “excused” to exclude the assignment from the student’s overall class grade."
- Google For Education
Exciting news! It just got easier to engage your audience in Google Meet! When you present in
Google Meet, you can now use cool tools to highlight and annotate your content.
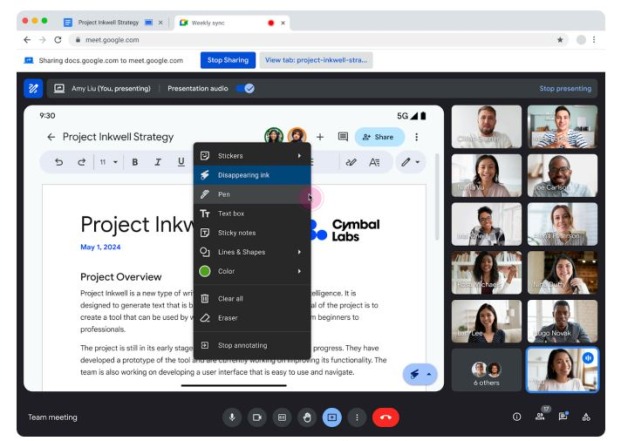
When you start presenting, annotations are automatically available to you. Just open the annotations menu to find fun options like a pen, disappearing ink, stickers, text boxes, and more!
Annotation tools can help you better showcase content and engage with your audience all while presenting
content in Google Meet.
Think of all the brainstorming, guiding, demonstrating, highlighting and training you can do with these
tools...
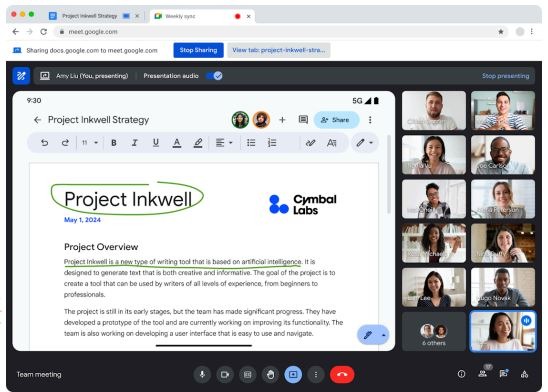
Want to tag-team your annotations? You can easily assign a co-annotator! Simply go to the people panel or hover over a user’s video tile, click the three-dot icon (more options), and select "add as co-annotator."
Everyone in the meeting can view your awesome annotations! (Keep in mind if you are working with users outside of our domain, not all Google Workspace Editions have access to creating annotations yet)
More information on how to Use Annotations In Google Meet.
[Please note, this feature is a part of the Workplace for Education Plus license. If you do not have this feature, and would like it, please contact the IT Help Desk.]
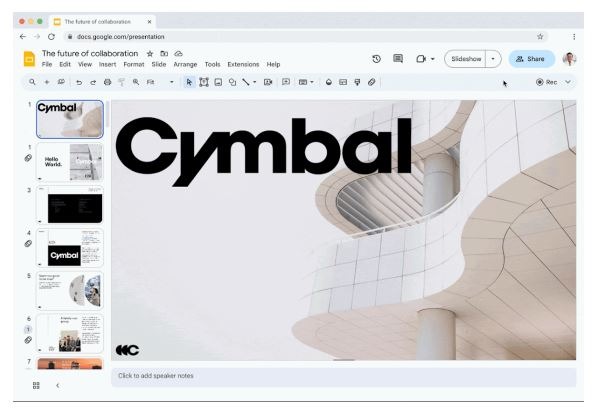
Record Yourself in Google Slides
Google released a new feature in Google Slides called "Slides Recordings." Now you can easily record yourself presenting, and then share the presentation with others to view anytime they want. Using slides recordings can help engage your audience, provide training or lessons effortlessly by recording presentations directly in Slides.
Please note:
- Recording can only occur using the Chrome Browser on a computer. (you can view, share, and delete recordings from any browser.)
- There's a 30-minute limit to every recording.
Find more details on how to use this feature.
[Please note, this feature is a part of the Workplace for Education Plus license. If you do not have this feature and would like
it, please contact the IT Help Desk.]

GIFs and stickers empower you to build visual, dynamic, and creative presentations that help you connect with your audience in Slides.
To add GIFs to your slides:
- Create a new presentation or open an existing presentation;
- Go to Insert > Image > GIFs and stickers > search for GIFs and/or stickers > click on one or several to insert into slides.
More information on how to insert or delete images and videos.
[Please note, this feature is a part of the Workplace for Education Plus license. If you do not have this feature, and would like it, please contact the IT Help Desk.]
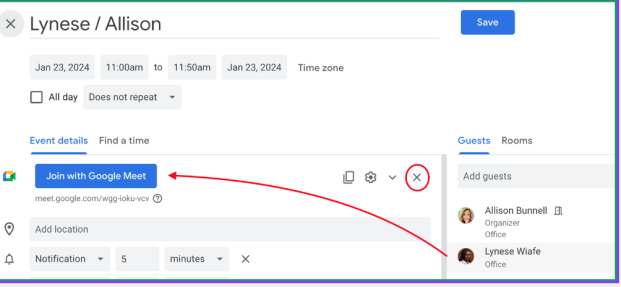
Did you know...
Once you add one or more guests to the guest list in a Google Calendar event, a Google Meet link will automatically generate and attach to the invite!
IF your event is in person, or you want to include a different link, be sure to X out the generated Meet link. Then the link does not appear. In turn, your guests aren’t wondering whether or not your event is remote or has the option to be
Training Resources and Videos
Kahoot! is a free game-based learning platform. Its learning games, "Kahoots," are multiple-choice quizzes that allow user generation and can be accessed via a web browser, phone, or the app itself.
Poll Everywhere is a free web-based audience response system that lets you embed interactive activities directly into your presentation. The audience responds on the web or via SMS texting on their phones.